0x00 准备
连接数据库所需要的包
链接: https://pan.baidu.com/s/1jemNkAbqtewkB4Dp5wn4Tg 提取码: 9n780x01 开始
创建工程后 右键->New->Folder 然后Folder name:lib
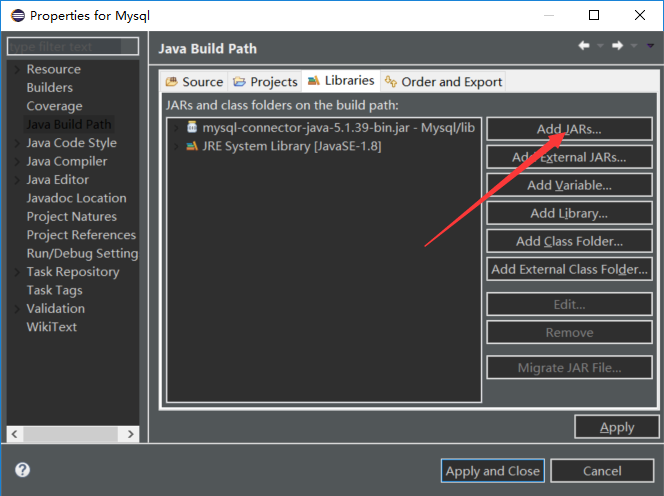
创建完后把下好的jar拖进去 再右键->Bulid path->Configure build path
点击Add JARs
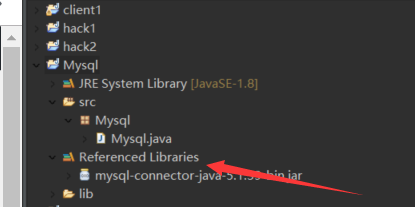
把刚在那个jar添加进去 就会发现多了个Libraries 这就成功了
最后附上代码可以用本地数据库也可以连接服务器数据库1
2
3
4
5
6
7
8
9
10
11
12
13
14
15
16
17
18
19
20
21
22
23
24
25
26
27
28
29
30
31
32
33
34
35
36
37
38
39
40
41
42
43
44
45
46
47
48
49
50
51
52
53
54
55
56
57
58
59
60
61
62
63
64
65
66
67
68
69
70
71
72
73
74
75
76
77
78
79package Mysql;
import java.sql.*;
public class Mysql
{
// JDBC 驱动名及数据库 URL
static final String JDBC_DRIVER = "com.mysql.jdbc.Driver";
static final String DB_URL = "jdbc:mysql://119.29.221.116:3306/students";//dbc:mysql://ip:端口/数据库
// 数据库的用户名与密码,需要根据自己的设置
static final String USER = "user"; //数据库账号
static final String PASS = "password";//数据库密码
public static void main(String[] args)
{
Connection conn = null;
Statement stmt = null;
try
{
// 注册 JDBC 驱动
Class.forName("com.mysql.jdbc.Driver");
// 打开链接
System.out.println("连接数据库...");
conn = DriverManager.getConnection(DB_URL,USER,PASS);
// 执行查询
System.out.println(" 实例化Statement对象...");
stmt = conn.createStatement();
String sql;
sql = "SELECT * from users";
ResultSet rs = stmt.executeQuery(sql);
// 展开结果集数据库
while(rs.next())
{
// 通过字段检索
String id = rs.getString("user");
String name = rs.getString("name");
String url = rs.getString("pwd");
// 输出数据
System.out.print("ID: " + id);
System.out.print(", 站点名称: " + name);
System.out.print(", 站点 URL: " + url);
System.out.print("\n");
}
// 完成后关闭
rs.close();
stmt.close();
conn.close();
}
catch(SQLException se)
{
// 处理 JDBC 错误
se.printStackTrace();
}
catch(Exception e)
{
// 处理 Class.forName 错误
e.printStackTrace();
}
finally
{
// 关闭资源
try
{
if(stmt!=null)
stmt.close();
}
catch(SQLException se2)
{
}// 什么都不做
try
{
if(conn!=null)
conn.close();
}
catch(SQLException se)
{
se.printStackTrace();
}
}
System.out.println("Goodbye!");
}
}
有不足的地方请及时指出 我们共同学习!